ADMINISTRATION
Thursday, March 31, 2016
How to check if your Oracle client is 32 bit or 64 bit?
SOLUTION 1:
If logged into SQL Plus, the banner will tell you 64-bit if the 64-bit version is installed. If it does not specify 64-bit then it is 32-bit (even though it does not explicitly say so).
SOLUTION 2:
You can specifically query the info by running the following:
SELECT * FROM V$VERSION;
The banner will tell you 64-bit if the 64-bit version is installed. If it does not specify 64-bit then it is 32-bit.
SOLUTION 3:
Run the query to check the following:
select distinct address from v$sql where rownum<2;
If the address returned is 16 characters long, it is 64 bit.
If it is 32 bit you will get an 8 character address.
SOLUTION 4:
If the two directories $ORACLE_HOME/lib32 and $ORACLE_HOME/lib are existing then it is 64 bit. If there is only an ORACLE_HOME/lib directory then it is 32 bit client.
*Headsup: In newer versions of the client, the library is not included and this directory may not exist.
How to find total number of Oracle schema objects and its size??
select obj.owner "Owner", obj_cnt "Objects", decode(seg_size, NULL, 0, seg_size) "size MB" from (select owner, count(*) obj_cnt from dba_objects group by owner) obj, (select owner, ceil(sum(bytes)/1024/1024) seg_size
from dba_segments group by owner) seg where obj.owner = seg.owner(+)
order by 3 desc ,2 desc, 1;
from dba_segments group by owner) seg where obj.owner = seg.owner(+)
order by 3 desc ,2 desc, 1;
How to run SQL Tuning Adviser manually??
Step 1: Replace SQL_ID and TASK_NAME (Unique):
DECLARE
l_sql_tune_task_id VARCHAR2(100);
BEGIN
l_sql_tune_task_id := DBMS_SQLTUNE.create_tuning_task (
sql_id => 'XXXXX',
scope => DBMS_SQLTUNE.scope_comprehensive,
time_limit => 1800,
task_name => 'XXXXX_A',
description => 'Tuning task for statement 8p9qh5xwgc3fx_B in AWR.');
DBMS_OUTPUT.put_line('l_sql_tune_task_id: ' || l_sql_tune_task_id);
END;
/
Step 2: Validate if SQL Tuning Task is created or not (Status should be INITIAL):
select * from dba_advisor_log where task_name='XXXXX_A' order by task_id desc;
Step 3: Run the Advisor
EXEC DBMS_SQLTUNE.execute_tuning_task('XXXXX_A');
Step 4: Check the status in other session using command below: (It should show EXECUTING)
select * from dba_advisor_log where task_name='XXXXX_A' order by task_id desc;
Step 5: Once the Advisor task is completed. Generate report using command below:
SELECT DBMS_SQLTUNE.report_tuning_task(‘XXXXX_A') AS recommendations FROM dual;
Step 6: Analyze the report and implement the solution if necessary.
Source: Thanks Arbind!!!
How to configure RMAN??
Here i am using ORCL as primary database and CATDB as catalog database.
Step # 1: Connect to Target database(Target DB: The database on which Backup & Recovery to be performed) as sysdba.
Step # 2: Ensure the database has been configured with ARCHIVELOG mode or not?
Step # 3: If the database has been configured with ARCHIVELOG mode then skip the Step number 3 to 6, If not then Shutdown the database.
Step # 4: Startup the database in mount state.
Step # 5: Configure database in ARCHIVELOG mode.
Step # 6: Alter database to open state.
Step # 7: Ensure ARCHIVELOG destination.

Step # 8: Connect to RMAN prompt with target database.
Step # 9: Configure RMAN with controlfile auto-backup feature that will be auto-backup controlfile in case of major changes done in database.
 Step # 10: To enable backup optimization run the following command, by default backup optimization has been configured OFF.
Step # 11: Configure retention policy for backup.
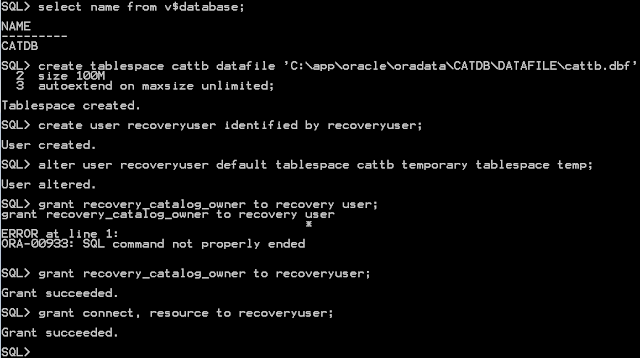
Step # 12: Connect to the recovery catalog database(RMAN Repository) & Create a tablespace to store RMAN catalog database objects. Create a RMAN user, assign RMAN tablespace to RMAN user as a default & grant recovery catalog owner,connect & resource privileges to RMAN user.
Step # 13: Connect to RMAN on target and recovery catalog database. Create catalog by issuing the following command in RMAN prompt. And then register database with recovery catalog
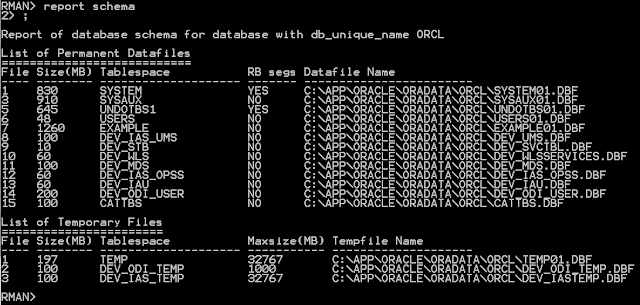
Step # 14: Check whether registration was successful.
Step # 1: Connect to Target database(Target DB: The database on which Backup & Recovery to be performed) as sysdba.
Step # 2: Ensure the database has been configured with ARCHIVELOG mode or not?
Step # 3: If the database has been configured with ARCHIVELOG mode then skip the Step number 3 to 6, If not then Shutdown the database.
Step # 4: Startup the database in mount state.
Step # 5: Configure database in ARCHIVELOG mode.
Step # 6: Alter database to open state.
Step # 7: Ensure ARCHIVELOG destination.

Step # 8: Connect to RMAN prompt with target database.
Step # 9: Configure RMAN with controlfile auto-backup feature that will be auto-backup controlfile in case of major changes done in database.
 Step # 10: To enable backup optimization run the following command, by default backup optimization has been configured OFF.
Step # 11: Configure retention policy for backup.
Step # 12: Connect to the recovery catalog database(RMAN Repository) & Create a tablespace to store RMAN catalog database objects. Create a RMAN user, assign RMAN tablespace to RMAN user as a default & grant recovery catalog owner,connect & resource privileges to RMAN user.
Step # 13: Connect to RMAN on target and recovery catalog database. Create catalog by issuing the following command in RMAN prompt. And then register database with recovery catalog
Step # 14: Check whether registration was successful.
Friday, March 18, 2016
Oracle Support: Coverage for Oracle Database Releases
Extended Support Fee for Oracle 11.2.0.4 waived until May 31, 2017 - Extended Support until Dec 2020
Friday, Oct 16, 2015, Oracle announced that the Extended Support for Oracle Database 11.2.0.4 will be waived until May 31, 2017. After this period of Waived Extendend Support,Extended Support for Oracle Database 11.2.0.4 will be offered until end of December 2020.
Saturday, March 12, 2016
How to Prevent a User to Drop Own Objects???
CREATE OR REPLACE TRIGGER trigger_prevent_drop BEFORE DROP ON DATABASE
BEGIN
IF ora_dict_obj_type = 'VIEW'
AND ora_dict_obj_owner = 'QO112_1616'
AND ora_login_user = 'QO112_1616'
AND ora_dict_obj_name='SAMPLE_NEW'
THEN
raise_application_error (-20000, 'YOU CAN NOT DROP SAMPLE_NEW VIEW!');
END IF;
END;
We will get an erorr message when trying to delete object in my case VIEW
Friday, March 11, 2016
Tuesday, March 8, 2016
How to create ODI Domain - Windows???
Configuration - Create ODI Domain
Execute config.cmd as shown below
Select "Create a new domain" and choose the location, Click "Next"Choose following templates from available templates, Click "Next"
- Basic WebLogic Server Domain – 12.2.1 [wlserver]*
- Oracle Enterprise Manager Plugin for ODI – 12.2.1 [em]
- Oracle Enterprise Manager – 12.2.1 [em]
- Oracle Data Integrator – Agent – 12.2.1 [odi]
- Oracle Data Integrator – Agent Libraries – 12.2.1 [odi]
- Oracle Data Integrator SDK Shared Library Template – 12.2.1 [odi]
- Oracle Data Integrator – Console – 12.2.1 [odi]
- Oracle JRF – 12.2.1 [oracle_common]
- WebLogic Coherence Cluster Extension – 12.2.1 [wlserver], Click "Next"
Create Administrator Account, Click "Next"
Choose "Production Mode", Click "Next"
Provide database connection information for schema <Prefix>_STB (Configured via Repository Creation Utility - RCU), Click "Get RCU Configuration" you should see result log as below, Click "Next"
Check database connection information (Schema, password, database service, listener port and hostname) - You should see this information while creating repository using RCU, Click "Next"
You should see next screen as below, Click "Next"
Give SUPERVISOR username and password (you should get this while creating Repository using RCU), Click "Next"
Configure Admin Server, Click "Next"
Configure Node Manager, Click "Next"
Configure ODI Manager Server, Click "Next"
Click "Next", Configuration without Cluster
Default value and Click "Next"
Click "Add" and Configure Unix Machine, Click "Next"
Add AdminServer and ODI_Server1 to the Unix machine, Click "Next"
Check Configuration Summary and Click "Create"
Domain Creation is completed!!!
Oracle Data Integrator (ODI) - Repository Creation Utility (RCU)
Configuring Database Schemas: RCU Configuration
Prerequisites:
The Database is already installed - In my case 12c Database
RDBMS Version : 12.1.0.2.0
Database User : SYS
Character Set : AL32UTF8'
Start Repository Creation Utility as shown in below screenshot
Welcome screen, Click "Next"
Choose "Create Repository" and then "System Load and Product Load", Click "Next"
Database Connection Details
Repository Creation Utility will check Prerequisites, you should see below, Click "OK"
Choose Components "AS Common Schemas" and "Oracle Data Integrator", click "Next"
RCU will check Prerequisites, you should see below, Click "OK"
Define password for main and auxiliary schema users, click "Next"
Define
Map and Create tablespaces, Click "Next"
RCU will create Tablespaces, Click "OK"
Summary, Click "Create"
Summary
Repository Creation Done, Click "Close"
Prerequisites:
The Database is already installed - In my case 12c Database
RDBMS Version : 12.1.0.2.0
Database User : SYS
Character Set : AL32UTF8'
Start Repository Creation Utility as shown in below screenshot
Welcome screen, Click "Next"
Choose "Create Repository" and then "System Load and Product Load", Click "Next"
Database Connection Details
- Database Server Name or IP Address
- Database Listener Port
- Database Service name
- Database user (with DBA or SYSDBA priveliges)
Repository Creation Utility will check Prerequisites, you should see below, Click "OK"
Choose Components "AS Common Schemas" and "Oracle Data Integrator", click "Next"
RCU will check Prerequisites, you should see below, Click "OK"
Define password for main and auxiliary schema users, click "Next"
Define
- Supervisor Password
- Work Repository type D - Development and E - Execution
- Work Repository Password, Click "Next"
Map and Create tablespaces, Click "Next"
RCU will create Tablespaces, Click "OK"
Summary, Click "Create"
Summary
Repository Creation Done, Click "Close"
Subscribe to:
Comments (Atom)


